Corsair FRAME 4000D RS ARGB Mid-Tower
Corsair FRAME 4000D RS ARGB Mid-Tower
Couldn't load pickup availability
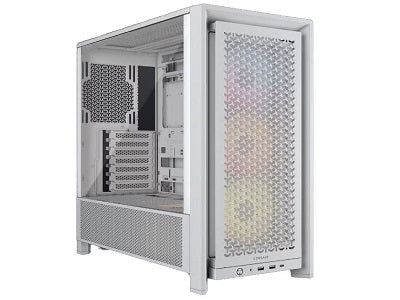
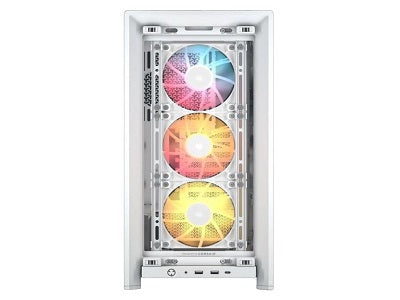
Light Up Your Build: Corsair 4000D RS ARGB Mid-Tower
Elevate your PC with the Corsair 4000D RS ARGB, a case that combines stunning aesthetics with top-tier performance. This mid-tower is a breeze to build in and comes equipped with three bright, addressable RGB fans right out of the box, ready to light up your components. Its spacious and smart design ensures excellent airflow and easy cable management, making it the perfect home for a build that's as cool as it is colorful.
⭐ Highlights
⭐ Highlights
Fully Modular Design | 3x RS120 ARGB Fans Included | Dual 360mm Radiator Support | Reverse Motherboard Compatibility | Integrated GPU Anti-Sag Arm
⚙️ Specifications
⚙️ Specifications
Case Form Factor: Mid-Tower
Motherboard Compatibility: ATX, Micro-ATX, Mini-ITX, E-ATX
Case Dimensions: 486 x 239 x 490 mm (H x W x D)
Max GPU Length: 430 mm
Max CPU Cooler Height: 170 mm
Radiator Support: Front: 360mm / 280mm, Top: 360mm / 280mm, Side: 360mm / 280mm, Rear: 120mm
Drive Bays: 2 x 3.5" HDD bays, 4 x 2.5" SSD mounts
Fan Support: Front: 3 x 120mm or 2 x 140mm, Top: 3 x 120mm or 2 x 140mm, Side: 3 x 120mm or 2 x 140mm, Rear: 1 x 120mm or 1 x 140mm
Front Panel I/O: 2 x USB 3.2 Gen 1 Type-A, 1 x USB 3.2 Gen 2 Type-C, 1 x Headphone/Mic Combo Jack
Case Material: Steel, Tempered Glass, Plastic
Side Panel Type: Tempered Glass
Included Fans: 3 x RS120 ARGB PWM Fans
Share


The POST-Check Protocol
-
Component Clearance
Action: Double-check the case's specifications for maximum GPU length, CPU cooler height, and radiator support before purchasing any part. Why: These are fixed limitations; if your CPU cooler is too tall or your GPU is too long, the side panel won't close or the components will physically block installation.
-
Standoff Alignment
Action: Verify the case has motherboard standoffs installed only in the locations that correspond to the holes on your specific motherboard (ATX, Micro-ATX, etc.). Why: Incorrectly placed standoffs can touch the back of the motherboard and cause a disastrous electrical short when the system is powered on.
-
I/O Panel Installation
Action: If the case uses a removable I/O shield (not pre-installed on the motherboard), snap it into the casebefore mounting the motherboard. Why: This is a common beginner mistake that forces you to remove the entire motherboard just to fit a small metal plate.
-
Airflow Pathway
Action: Follow the simple rule: Intake fans at the front/bottom draw cool air in, and Exhaust fans at the rear/top push hot air out. Why: A balanced, directed airflow path is the single most important factor for overall system temperature and long-term component health.
-
PSU Fan Direction
Action: When mounting the Power Supply Unit (PSU) at the bottom of the case, ensure its fan is facing downward toward the case's dust filter and external vent. Why: This configuration allows the PSU to pull cool, filtered air directly from outside the case, keeping its own temperature low and promoting overall case airflow.
-
Front Panel Headers
Action: Use the motherboard manual to correctly connect the tiny Front Panel Header cables (Power Button, Reset, USB, Audio) to the correct pins on the motherboard. Why: These small cables are essential for powering the system on and are often confusingly labeled, but the manual is the only sure guide for proper function.